2.1 Do I have to use the included shape?
No, you do not have to use the included shape.
If you choose to use your own shape, however, there are some values in your shape that you may need to change for hassle-free optimal fitting, which are listed briefly below.
Because a mesh head and a mesh body (or even the SL body) both have a neck "stem", there are some limits to what values can be used on some of the neck options in an avatar's shape. For example, if your Neck Length is set to a value that is less than the length of the two neck stems added together (one on the head and one on the body), then your neck may be distorted to the point where there are highly visible gaps, creases, bends, or other suboptimal alignment patterns as the two stems attempt to fit into a length that is too small for them.
To align correctly at the neck:
To align the Eyes and Eyelashes without any modification or editing, there are three values in the Head section of your shape which must match the WEAR IT! (for eyes) shape options that is included with your head:
Values that do not match the ones that originally were in the included shape may require editing to your Eye position / rotation and Eyelash fitting adjustments.
If you have already changed the position of your eyelashes, right click on your lashes (it helps if your avatar is standing still and you have zoomed in on the face), and choose "Touch". When the popup menu appears, choose "reset" to put your lashes back to their original position. If a popup menu does not appear after taking script lag and location into account, then you may have to move your eyelashes back into place using the positioner HUD or the edit menu if they are not attached.
If you choose to use your own shape, however, there are some values in your shape that you may need to change for hassle-free optimal fitting, which are listed briefly below.
Because a mesh head and a mesh body (or even the SL body) both have a neck "stem", there are some limits to what values can be used on some of the neck options in an avatar's shape. For example, if your Neck Length is set to a value that is less than the length of the two neck stems added together (one on the head and one on the body), then your neck may be distorted to the point where there are highly visible gaps, creases, bends, or other suboptimal alignment patterns as the two stems attempt to fit into a length that is too small for them.
To align correctly at the neck:
- Neck Thickness: between about 20-50
- Neck Length: at least 30, and generally no greater than 60 or 70 (depending on the body/head). Any value outside of this range is liable to cause distortion / texturing issues when matching up with the body applier (especially if you are using a mesh body).
- Body Fat: must be one of these values: 0, 5, 7, 11, and 24. (These typically correspond to XS, S, M, L, and XL, respectively.)
To align the Eyes and Eyelashes without any modification or editing, there are three values in the Head section of your shape which must match the WEAR IT! (for eyes) shape options that is included with your head:
- Head Size
- Head Stretch
- Head Length
Values that do not match the ones that originally were in the included shape may require editing to your Eye position / rotation and Eyelash fitting adjustments.
If you have already changed the position of your eyelashes, right click on your lashes (it helps if your avatar is standing still and you have zoomed in on the face), and choose "Touch". When the popup menu appears, choose "reset" to put your lashes back to their original position. If a popup menu does not appear after taking script lag and location into account, then you may have to move your eyelashes back into place using the positioner HUD or the edit menu if they are not attached.
2.3 I don't want to use the included shape, so how do I fix my Eyes and Eyelashes?
If you do not want to use the included WEAR IT! (for eyes) shape, then to make your Eyes and Eyelashes fit without having to edit them, you can change three values in your shape to make them fit instantly (Head Size, Head Stretch, and Head Length). Go to the v2 Head Shape Values page, find your Head Name, and use the values listed.
If you do not want to change even those three values of your shape, then you will need to edit the position and rotation of each Eye and use the included Eyelash Positioner
If you do not want to change even those three values of your shape, then you will need to edit the position and rotation of each Eye and use the included Eyelash Positioner
2.5 My eyelashes are gone, what do I do?
If you have a v2 Static or Emotions Static Head, then you will need to locate your Eyelash item in your inventory and attach it (or re-attach it), first, to make sure that it wasn't simply missing physically before trying to fix them with the HUD, as written below.
Use your Skin HUD to turn Eyelashes On/Off:
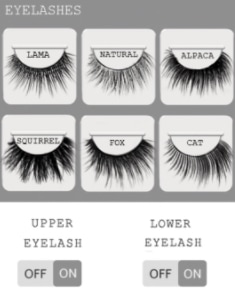
If your Eyelashes are still missing, click on one of the Eyelash Applier styles (Lama, Natural, Alpaca, Squirrel, Fox or Cat). It can be any of these choices, but try not to click on the same one you were wearing (or trying to wear) when your eyelashes disappeared. It won't ruin anything if you try clicking on all of them, one after another, as long as you give it a bit of time to activate the script between clicking.
- Locate your v2 Skin HUD that came with your v2 Head in your inventory.
- Right click on the HUD item in your inventory and the left-click on the ADD option.
- Now, in the left hand corner of your HUD, in the Eyelashes section:
- Click OFF for both Upper and Lower Eyelashes.
- Click ON for both Upper and Lower Eyelashes.
If your Eyelashes are still missing, click on one of the Eyelash Applier styles (Lama, Natural, Alpaca, Squirrel, Fox or Cat). It can be any of these choices, but try not to click on the same one you were wearing (or trying to wear) when your eyelashes disappeared. It won't ruin anything if you try clicking on all of them, one after another, as long as you give it a bit of time to activate the script between clicking.
2.6 How do I fix my Eyelashes?
- If your Eyelashes have disappeared, please see question 2.5, above.
- If your Eyelashes have a "face" texture on them, please see question 2.4, above.
- If you do not want to use the three head shape values required for Eyes & Eyelashes fitting on your v2 Head, you will need to use the Eyelash Positioner HUD item in your v2 Head package to adjust the position of your Eyelashes.
- Locate and ADD your HUD_Genesis_Eyelashes_Positions_1.x item, found in your v2 Head's folder.
- Use the Up, Down, Forward, Back buttons to correct the Eyelashes position on your v2 Head. (You may want to zoom in close to your face.)
- The Left and Right buttons will move ALL of the Eyelashes at once, so unless you do not feel they are centred on your v2 Head, these buttons will only cause you trouble to use.
- The + and - buttons will scale the amount of change that the other buttons will move your Eyelashes. If you click on the + button, it will increase the amount of movement "UP" that the Up button moves your Eyelashes in a single click.
- Be careful when using this HUD as clicking too many times can cause it to permanently crash and leave you without an option to move your Eyelashes again (as you cannot reset the HUD due to its permissions) - see question 2.7 below!
- If you have moved your Eyelashes but now would like them back to their original position, you will need to reset them:
- If your Eyelashes have the script inside of them, you will need to Right Click -> Touch on your Eyelashes and choose "Reset" from the Script Menu.
- If your Eyelashes do not have the script inside of them, you will need to use the HUD to move them back into position manually.
2.7 The Eyelash position HUD gave me an error, now what?
As the HUD_Genesis_Eyelashes_Positioner_1.x item is no modify in all v2 Head Type packages, you will not be able to reset the scripts in the item. If you receive this error with a v2 Head that you purchased from the store, you will need to discard the current v2 Head folder and open a new fresh copy from your v2 Head package (or have one redelivered to you if you have purchased it recently). This is the cleanest method to resolve the error.
However, If you receive this error with a no-copy (i.e. Gacha) v2 Head, you will need to first see if the head will reset.
However, If you receive this error with a no-copy (i.e. Gacha) v2 Head, you will need to first see if the head will reset.
- Right click on your head and choose "Touch" to first reset the face (if possible). If the face resets, then the scripts are still working on the head at least, and you can use the following process to clean the head and return its functions.
- Attach a regular (large) v2 Genesis Lab Skin HUD and click all of the "clear" buttons on the left.
- Choose a different eyelash texture from the HUD to apply.
- Turn the eyelashes off and then on again.
2.8 How do I change my Eyelashes?
Your v2 Head will have the option to change the style of the Eyelashes (and sometimes shade), by using a v2 Eyelash Applier, with some exceptions.
Some v2 Eyelashes also have an internal resizing script which you can use to resize your attached Eyelashes.
- If your v2 Skin HUD has an Eyelash section (see image in 2.5, above), you can use the different style buttons to change your lashes or turn them off completely.
- If you have the v2 Jiang Head or have the v2 Nelly (Gacha) head, they have their own Eyelash Appliers, which are exclusively compatible with their individual mesh heads.
- For v2 Eyelash Applier compatibility, please see the bottom of the References section - Eyes & Eyelash Appliers.
Some v2 Eyelashes also have an internal resizing script which you can use to resize your attached Eyelashes.
2.9 How do I make the eyes align?
If you are using the Genesis Lab eyes that go with any of the v2 Heads, you will be able to use their original positions to re-align them to your head. If you are using other eyes, use the Genesis Lab eyes as guides for your other brand before detaching them.
To reset your eyes to their original positions, please see 2.10 (below).
To reset your eyes to their original positions, please see 2.10 (below).
2.10 I moved the eyes but how do I reset their positions?
To reset your eyes back to their original position, you will need to copy and paste each of the position values and rotation values, for your v2 Head Name from the v2 Eyes and Eyelashes page. These values have been saved from fresh, unaltered v2 Head packages.
2.11 How do I fix the Skin/Body texture seam?
There are some simple fixes and some not-as-simple fixes to any perceived mismatch between the Skin applied to the Neck of the Head and the Body Skin applied to a mesh or classic body. Given the specific nature of the instructions for a not-as-simple fix, the most common steps to go through are listed on a separate page: Skin & Body Matching.
2.12 What is the complexity for each Genesis Lab v2 Head?
The complexity (ARC) for each of the v2 Genesis Lab Heads are shown (if known) in the References section: Head Type Catalog.
2.13 What are the differences between the Genesis Lab Head Types?
The different Genesis Lab Head Types are explained in the References section: Head Type Catalog.
2.14 How do I make my Vista Bento Hands match my Genesis Lab v2 Skin?
Currently, there are no v2 Genesis Lab Vista Bento Hands Appliers available to match your Genesis Lab v2 Skin Tone. Please message the CSRs in-world to request this feature for a future release.
However, if you use Maitreya, Belleza, or Slink mesh bodies with bento hands updates, your regular v2 Body Appliers will work like normal with them.
However, if you use Maitreya, Belleza, or Slink mesh bodies with bento hands updates, your regular v2 Body Appliers will work like normal with them.
2.15 How do I get another brand of Ears to match my Genesis Lab v2 Skin(s)?
As there are a number of different brands that make mesh Ears, these instructions will evolve over time. Mesh ears that have available Genesis Lab Skin Tone Appliers are listed directly with any in-world location or MP link where these items can be found. All others with a tinting system will list a "recipe" for how to match your GL Skin Tone, if available (feel free to share any recipes that you use here to add to the list!).
For ^^Swallow^^ Brand of HD Ears:
Colour Matching Recipes Coming Soon!
For ^^Swallow^^ Brand of HD Ears:
Colour Matching Recipes Coming Soon!
2.16 What can I do if I receive a Stack Heap Collision on my Gacha Head after using the Eyelash Positioner?
If this has happened to you, please see 2.7 on this page.
2.16 How do I make the v2 Male Head work with the Signature Gianni body?
The v2 Heads and Skins were designed and created before the Signature Gianni body was released, so there are only approximate methods to make the v2 Heads work with the body.
