Settings Tab
|
Neck Section:
This section works with the Neck Fix that comes in your v3 Bento Head package.
To change the colour of your Neck Fix:
To fit the Neck Fix to your mesh body:
PLEASE NOTE: This section does not work with any neck fix supplied by your mesh body! This section only works with the Neck Fix that comes in your Genesis Lab v3 Bento Head package. Teeth & Tongue Section:
This section allows you to alter the shape and appearance of the Teeth item that is part of your v3 Bento Head package. Teeth Shapes:
The three icons in the centre of this section change the shape of your Teeth, from left to right:
|

|
Braces & Piercings:
On the left side of this section are two options for Braces: the colour of the bands around the metal brackets (12 options), and two choices of metal colour for the brackets themselves (below the band colours).
On the right side of this section are the different Piercing colours (8 shades), and then the two switches to turn the Piercings and Braces On and Off.
- Hide: Hide the Piercing or Braces.
- Show: Show the Piercing or Braces.
Skin Shine Section:
This section changes how much shine (specular reflection) you have on your skin. 0% is no shine (dead-looking skin in full light) and 100% is full-shine (oil slick). It is set at a default amount which corresponds to most of the default mesh body values (25%).
This section changes how much shine (specular reflection) you have on your skin. 0% is no shine (dead-looking skin in full light) and 100% is full-shine (oil slick). It is set at a default amount which corresponds to most of the default mesh body values (25%).
- At 0%, your face will look completely matte, without any natural shine -- similar to suede / dead skin in direct light.
- At 25%, your face will not have the appearance of dew or sweat, but it will not be completely matte. This is closest to a "fresh" look in direct light.
- At 50%, your face will look "dewy" in direct light.
- At 75%, your face will look "sweaty" in direct light.
- At 100%, your face looks completely "wet" with oil in direct light.
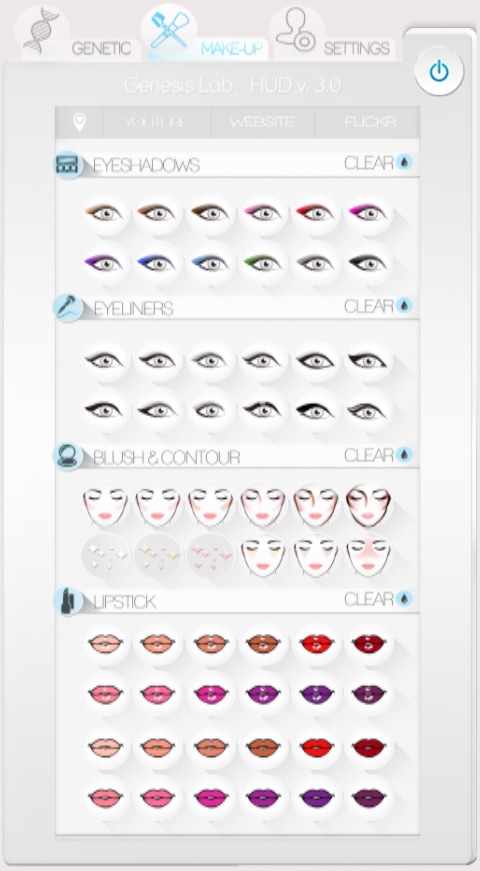
Make-Up Tab
|
Eyeshadows Section:
PLEASE NOTE: Eyeshadows and Eyeliners apply to the same layer (Eyes Layer), so you will only be able to apply one at a time.
Eyeliners Section:
PLEASE NOTE: Eyeshadows and Eyeliners apply to the same layer (Eyes Layer), so you will only be able to apply one at a time.
Blush & Contour Section:
PLEASE NOTE: Blush, Contour, Freckles, etc. all use the Tattoo Layer for their appliers, so you will be only be able to apply one at a time.
Blush & Contour Top Line of icons:
|
|
Lipstick Section:
These apply to the Lips Layer.
These apply to the Lips Layer.
- Use the Clear icon (blue droplet) on the right hand side of the Lipstick title bar to remove any applied Lipstick.
- Click on an icon to apply your chosen style and shade.
- Top Two Lines of icons: 12 Shades of Shiny Lipstick.
- Bottom Two Lines of icons: 12 Shades of Matte Lipstick.
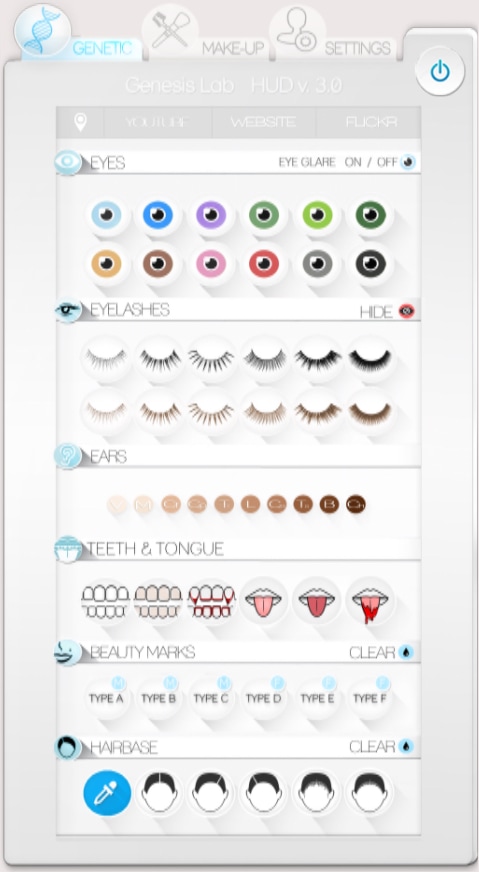
Genetic Tab
|
Eyes Section:
Eyelashes Section:
Top Line of icons:
If you wish to use other eyelashes or simply hide the eyelashes that are attached to your v3 Bento Head, click on the red hide icon to the right of the Eyelashes title bar. Ears Section:
Teeth & Tongue Section:
There are six different icons in this section representing colour changes to the Teeth (3) or the Tongue (3) respectively. Teeth (the first three icons on the left from left to right):
|
|
Beauty Marks Section:
These icons apply to the tattoos layer of your face, thus will overwrite any blush, contour, highlighting or tattoos that you are currently wearing.
These icons apply to the tattoos layer of your face, thus will overwrite any blush, contour, highlighting or tattoos that you are currently wearing.
- Type A: Applies a mole above the lip and and along the jaw line.
- Type B: Applies a mole to either cheek and one on the side of the chin.
- Type C: Applies a mole to either cheek, one to the lower jaw and two on the side of the chin.
- Type D: Applies a light dusting of freckles across the bridge of the nose.
- Type E: Applies a broader brush of freckles across the bridge of the nose onto the apples of the cheeks.
- Type F: Applies freckles to entire face (ginger-style).
- Click the Clear icon (blue droplet) to the right of the Beauty Marks title bar to remove any tattoos.
Hairbase Section:
This section consists of a blue dropper icon (to choose the colour of the hairbase) and five different styles of hairbase icons.
Please Note: If you decide to change your hairbase style, you will have to re-set your hairbase colour using the dropper icon. The colour picker will retain the last colour used, however, when closed.
- The different hairbase styles are (from left to right): Centre Part, Left Part, Right Part, Centre Part Seamless Ponytail, No Part Seamless Ponytail.
- Click on the hairbase style that you wish to use first, then click on the blue dropper icon to change the colour.
- The blue dropper icon will open a standard colour picker to choose from a clickable spectrum and brightness slider.
- Click the blue dropper icon to close the colour picker.
- Click the Clear icon (blue droplet) to the right of the Hairbase title bar to remove the Hairbase.
