This FAQ was written and is maintained by a third-party entity, Scorpius (Aiorii Resident). This FAQ makes no claim of official accuracy, endorsement, nor condoning by Genesis Lab. Please direct all questions regarding this FAQ to Scorpius.
This guide to the Genesis Lab v3 Bento Heads has three sections: Folder Contents, Wearing the v3 Bento Head, and Using the v3 Bento Head. The wearing and using sections also contains tips for working with your Head past getting started.
This guide to the Genesis Lab v3 Bento Heads has three sections: Folder Contents, Wearing the v3 Bento Head, and Using the v3 Bento Head. The wearing and using sections also contains tips for working with your Head past getting started.
Folder Contents
Inside of your v3 Bento Head Package Folder are many items. This section details where/when each item is used.
Gestures
Angry, Kiss, Sadness, Sexy, Sleep, Smile 1, Smile 1 :) 1, Surprise, Tongue, Wink 1, and Wink 2 are all gestures that are very limited in their use due to the fact that they are no modify. In general though, each of these gestures will animate your new head with either a chat command or a key-press. See Bento Head Logistics for more information about using these gestures.
Angry, Kiss, Sadness, Sexy, Sleep, Smile 1, Smile 1 :) 1, Surprise, Tongue, Wink 1, and Wink 2 are all gestures that are very limited in their use due to the fact that they are no modify. In general though, each of these gestures will animate your new head with either a chat command or a key-press. See Bento Head Logistics for more information about using these gestures.
Alphas
There are two alpha textures located in your package:
If you don't plan on wearing the old system eyes, regardless of which brand of eyes you use (I do suggest using the included bento eyes, at least at first), make sure you ADD (not WEAR) the Genesis_Lab_Alpha_Head(for mesh eyes) because it will hide the old system eyes (that you can't take off).
What happens if you WEAR not ADD the alpha item? The reason to use ADD, and not WEAR, is that WEAR is a replacement of any item which attaches to the same location. For an alpha item, if you are wanting to wear more than one alpha texture (say, one for your new head and one for your mesh body), choosing to WEAR the Genesis_Lab_Alpha_Head(for mesh eyes) item will replace the alpha item that you are already wearing.
There are two alpha textures located in your package:
- Genesis_Lab_Alpha_Head
- Genesis_Lab_Alpha_Head(for mesh eyes)
If you don't plan on wearing the old system eyes, regardless of which brand of eyes you use (I do suggest using the included bento eyes, at least at first), make sure you ADD (not WEAR) the Genesis_Lab_Alpha_Head(for mesh eyes) because it will hide the old system eyes (that you can't take off).
What happens if you WEAR not ADD the alpha item? The reason to use ADD, and not WEAR, is that WEAR is a replacement of any item which attaches to the same location. For an alpha item, if you are wanting to wear more than one alpha texture (say, one for your new head and one for your mesh body), choosing to WEAR the Genesis_Lab_Alpha_Head(for mesh eyes) item will replace the alpha item that you are already wearing.
Mesh Objects & HUDs
These are your actual pieces that make up your head and its multiple HUD controllers. Here is what each one is and what it does -- remember that NAME means the name of your specific Genesis Lab v3 Head, and that the x in 3.x means for all numbers of x, currently.
These are your actual pieces that make up your head and its multiple HUD controllers. Here is what each one is and what it does -- remember that NAME means the name of your specific Genesis Lab v3 Head, and that the x in 3.x means for all numbers of x, currently.
- Genesis_Head_NAME_3.x Bento :: this is your actual bento mesh head.
- Genesis_Head_NAME_3.x Bento - Omega :: this is the Omega-cosmetic applier version of your bento mesh head. You will need to use this separate head if you would like to apply Omega-compliant, non-Genesis Lab-specific appliers.
- Genesis_Head_NAME_Ears_3.x_Bento :: these are your bento ears that change with your shape (and, in theory, be animated).
- Genesis_Head_NAME_Lacrimal_Caruncle_3.x Bento :: this is for a future upgrade to add more expressive emotions, like tears.
- Genesis_Lab_HUD_3.x_Basic_Animation :: this is your essential set of poses and animations in a smaller, separate HUD to control the expressiveness of your head. (It has its own guide as well!)
- Genesis_Lab_Eyes_v3.x Bento :: these are your bento eyes that change with your shape and be animated.
- Genesis_Lab_HUD_3.x_Settings_Universal :: this is your main controlling HUD for your head, and you use it after you are wearing all of the items that you would like to control for your head. (It has its own guide, don't worry!)
- Genesis_Lab_HUD_3.x_Typer :: this is a little AO to make your head "talk" when typing.
- Genesis_Lab_Neck_Fix_3.x Bento :: this is in case you have a seam between your neck and your body textures that is not resolved by other means.
- Genesis_Head_NAME_Teeth_3.x_Bento :: these are your bento teeth + tongue that can be animated.
Everything else
The items left in the folder are: the store landmark, notecards about updates / Omega compatibility / the location of matching body appliers, an animation script that was in the purchase bag/box, and the default Genesis Lab Bento Shape, in case you would like to use it.
The items left in the folder are: the store landmark, notecards about updates / Omega compatibility / the location of matching body appliers, an animation script that was in the purchase bag/box, and the default Genesis Lab Bento Shape, in case you would like to use it.
Wearing the Genesis Lab v3 Bento Head
This part is much easier now that we've outlined what's in your folder. There are a few things that can make wearing your head easier to manage as well as some simple solutions for basic problems.
In this guide, 3.x means any number for x, like 3.1, 3.2, etc. NAME means the name of your head (like Eva or Lena). If you need to check the folder contents to make sure you are choosing the correct item to wear, check the section above (folder contents).
Quick-Fix Tip: Before adding any of the items for your new head, save your current outfit (Appearance window). This way, if you accidentally choose WEAR instead of ADD -- you can easily go back!
Tip: It is also helpful when you are working with your avatar to use a pose stand to keep your avatar still like a doll.
1. Underlying Items First (to decrease the likelihood of your mesh head warping on "off" days)
Locate the Genesis_Lab_Alpha_Head(for mesh eyes) item in your Head's folder and ADD it.
This will clear any old second life default avatar body out of the way. We use the one with (for mesh eyes) because we will be adding the eyes that came with your head (at least for now). To use any eyes other than the system eyes (default second life ones), you must use this alpha item.
If you would like to see your Genesis Lab v3 Bento Head the way it shows in any of the promotional photos, you will need to either use the shape that comes with the Skin (or Head), or change your shape's Head, Eyes, Nose, Mouth and Chin settings to match the settings from the Skin's shape. This is optional because a Bento head will change how it looks based upon the shape you are wearing, so you can also simply try your current shape first.
Please Note: if your current shape was not designed for the Genesis Lab v3 Bento Head, your head may look very warped / deformed when you attach it to your avatar! Do not worry though, because you can change it easily by editing your shape (or using a new one, etc.) -- it's not permanently stuck that way! (And if it seems like it is stuck that way, then relog as shape changes can need a bit of bone refreshing every now and then.)
2. Ears, Teeth, and Eyes
To start with, we will add all of the standard features of the Genesis Lab v3 Bento Head to your avatar, which includes the Ears, Teeth, and Eyes. The Teeth contains the tongue, throat, etc. so you are actually adding an entire "inside" of the mouth when you add the Teeth item. These items are all bento-rigged so you will not have to (nor can you) adjust their position.
Locate the following items in your Head's folder and ADD them (it may look unsightly, lol):
- Genesis_Head_NAME_Ears_3.x_Bento
- Genesis_Head_NAME_Teeth_3.x_Bento
- Genesis_Lab_Eyes_v3.x Bento
3. The Head!
With all that set up, this part seems almost too easy!
Locate the v3 head item in your Head's folder and ADD it. That's your new head! Ta-da!
If you would like to use the Omega head instead of the regular Genesis Lab version, ADD this v3 head item instead:
Please Note: Your new head will be un-skinned! The next section of the guide will walk you through the basics of using your head, which includes putting a face on your very lovely white head (lol).
With all that set up, this part seems almost too easy!
Locate the v3 head item in your Head's folder and ADD it. That's your new head! Ta-da!
- Genesis_Head_NAME_3.x Bento (Please Note: 3.x can mean 3.0, 3.1, 3.2, etc.)
If you would like to use the Omega head instead of the regular Genesis Lab version, ADD this v3 head item instead:
- Genesis_Head_NAME_3.x Bento - Omega (Please Note: This head will still need a Genesis Lab Skin applied to it, as Omega appliers are cosmetics only!)
Please Note: Your new head will be un-skinned! The next section of the guide will walk you through the basics of using your head, which includes putting a face on your very lovely white head (lol).
Tip: If you save your outfit now, you'll have an outfit which contains your head fully-assembled on your avatar. Using your Genesis Lab 3.0+ Bento Head won't add anything to your head that you need to keep in an outfit (for the most part), so you can use this new saved outfit as a starting point for using your mesh head if you need to come back to it later.
Quick-Fix Tip: If putting on your head has made your eyeballs pop through the head or dislocated your jaw or other some such warping/deforming action (like, eyelashes in the middle of your eye, etc.), simply relog. Sometimes the store of information in your viewer gets corrupted and the only way to fix it is to simply "flush" it by relogging.
Quick-Fix Tip: If putting on your head has made your eyeballs pop through the head or dislocated your jaw or other some such warping/deforming action (like, eyelashes in the middle of your eye, etc.), simply relog. Sometimes the store of information in your viewer gets corrupted and the only way to fix it is to simply "flush" it by relogging.
Using the Genesis Lab v3 Bento Head
With your Head attached, let's work through a few of the basics to using your head. There is a link to a full instruction guide for the Settings Universal HUD and the Basic Animations HUD for when you want to go further, as this section will only cover the essentials.
In this guide, NAME means the name of your head (like Eva or Lena) and SKINTONE means the name of the skin colour you've chosen (like Milk, Cream, Cappuccino, etc.)
In this guide, NAME means the name of your head (like Eva or Lena) and SKINTONE means the name of the skin colour you've chosen (like Milk, Cream, Cappuccino, etc.)
1. How Textures Work on the Head
With all of the current mesh heads (Genesis Lab brand or other), there are a set of invisible layers sitting on top of the mesh head itself. The mesh head and these layers allow you to apply textures to them and add things like skins, eyeshadows, lipsticks, or tattoos to the head. All of these areas of the head are no-modify, so you must use an Applier to change the texture of these layers.
An Applier is a HUD that you attach (ADD) to your Avatar and then use the buttons to apply the texture changes to your head. The Genesis Lab v3 Bento Mesh Head has the following areas which can be changed by an Applier, with layers that will work with Omega Appliers on the Omega Head version noted:
Now that you know what layers you have available on your head, let's start by adding a Skin in the next part of this guide.
With all of the current mesh heads (Genesis Lab brand or other), there are a set of invisible layers sitting on top of the mesh head itself. The mesh head and these layers allow you to apply textures to them and add things like skins, eyeshadows, lipsticks, or tattoos to the head. All of these areas of the head are no-modify, so you must use an Applier to change the texture of these layers.
An Applier is a HUD that you attach (ADD) to your Avatar and then use the buttons to apply the texture changes to your head. The Genesis Lab v3 Bento Mesh Head has the following areas which can be changed by an Applier, with layers that will work with Omega Appliers on the Omega Head version noted:
- Bento Head Location
- The Mesh Head Layer (This is where any Skin will apply.)
- Lips or Beard Layer (This is a semi-circular area around the mouth for Lipsticks and other appliers; Omega applier compatible.)
- Eyes Layer (This is a mask of the face around the lips area for Eyeshadows and other appliers; Omega applier compatible.)
- Tattoo Layer (This is the entire head for Tattoos and other appliers; Omega applier compatible.)
- Hairbase Layer (This is for a "cap" that covers the back of the head for Hairbases and other appliers; Omega applier compatible.)
- Neck Tattoo Layer (This is a cylinder around the entire neck for skin-matching and other appliers.)
- Eyelashes (This is where any Eyelashes will apply a texture.)
- Bento Eyes Location
- Base Layer (This is where most Eyes will apply a texture.)
- Lens Layer (This is where a shine (or blackout) will apply a texture.)
- Bento Ears Location
- Ears Layer (This is where any Ears will apply a texture.)
Now that you know what layers you have available on your head, let's start by adding a Skin in the next part of this guide.
2. Apply Your Skin to your Head
Although the steps for applying a skin are written for the Genesis Lab Skin Appliers, the same general idea of attaching the HUD and clicking on a button, then detaching, will apply to any Skin Applier, and really, any Cosmetic Applier as well.
Genesis Lab v3 Skins (as well as Genesis Lab v2 Skins) come packaged in a box, so you will need to add the package and accept the folder before being able to use the applier. (If that fails, simply rez the package on the ground and open, then copy/move the contents to your inventory). For v2 Skins that come with v2 Heads, the HUD will be in your Head's Folder.
- Locate your Skin's Folder and ADD the HUD_Genesis_Lab_Skin_NAME_SKINTONE item.
|
|
|
|
- Once you have applied your Skin, it may take a few moments to finish applying the texture to the head. The reason it will take a moment or two at first is because it is loading the texture into your viewer's image store (cache) and matching up the UV map to the head points. Once it has finished applying however, it is now in your cache (unless you change which Skin is applied, in which case then it might be tossed out and require it to be re-loaded if you decide to use it again).
- If your Skin persists in staying grey or not coming in fully, you can try clicking on the eyebrow button again. (If you have applied any cosmetics, try removing them and clicking the eyebrow button on the Skin Applier again -- but don't worry if you haven't done anything yet.) Sometimes Second Life has periods where an item on your avatar has seemingly gotten "caught" and prevents you from changing parts of your avatar. You can try removing other items to see if your skin appears and then add those items back after.
With the base skin applied, we'll take a look at some basic features of the HUD in the next section of the guide and explain what the head can and can't do.
3. Basics of your Bento Head
This section covers some basics of using your Genesis Lab v3 HUDs, but leaves out much of the full walk-through of the HUD, more advanced topics, and any detailed troubleshooting / support, which are indicated by links to those specific topics in the more information section at the bottom of this page. Please see those links for any issues when using your Genesis Lab v3 Settings Universal HUD or Genesis Lab v3 Basic Animation HUD.
In this FAQ, 3.x means any version that is 3.0 or a higher decimal value, such as 3.1, 3.2, etc. Always check with the redelivery terminal to see if you have the latest version. For any specific version stated (like "version 3.2"), a lower decimal value (like 3.0) may not work the same way or may have issues.
3.1 Bento & Animation Background Information
Let's start with a little bit of foundational information. With the arrival of Bento (which are essentially more virtual bones in your virtual body), your head has become more like a fitmesh body in that it responds to sliders in your shape and you will be able to use animations made by animators, including using any new face/head AOs that come out.
Also like a mesh body, your Genesis Lab v3 Bento Head does not contain any animations within the head itself. There are two major reasons why it is advantageous not to have the animations inside the mesh head:
- Due to the way that animations work in Second Life, any animations placed into the head itself could easily cause numerous issues if you attempted to use animations other than the ones inside the head. This is also the same reason why mesh bodies do not typically include animations inside the body itself.
- Mesh avatar replacement body parts such as bodies, hands, feet, and heads are no modify. The reason they are no modify is due to the perception (whether true or not) that modify parts are easier to copy the textures without permission. This is why there are ubiquitous appliers that apply textures onto no modify mesh parts. What this means for any animations placed inside of a mesh body part is that you wouldn't be able to delete individual ones easily (or even all of them), which then makes any problems that come about because of the Second Life animation queue eccentricities permanent.
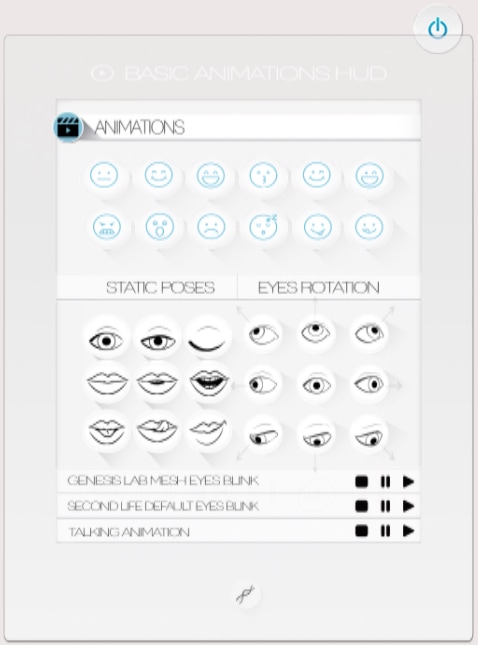
3.2 The Basic Animation HUD
The Genesis Lab v3 Bento Head, whist it does not come with a Skin, it does come with physical options, standard cosmetics and a set of basic emotion expression animations and poses for your head. These are located inside of the HUD that comes with your head package.
The Genesis Lab v3 Bento Head, whist it does not come with a Skin, it does come with physical options, standard cosmetics and a set of basic emotion expression animations and poses for your head. These are located inside of the HUD that comes with your head package.
- Locate the Genesis_Lab_HUD_3.x_Basic_Animation item inside your head folder and ADD it.
|
This HUD has the AO buttons (icons) to control your head's animations and poses.
|
Please Note: As the head itself doesn't have animations built in, you must keep the HUD up to continue animating your head. However, there are options for creating your own light-weight AO for your head instead of keeping the Basic Animation HUD attached to your avatar, especially if you are only using it occasionally but would like to keep your avatar blinking. For how to set up a light-weight simple AO for your head, please see the more information section at the bottom of this page.
Tip: You can use any bento-based head animation (by any brand) to animate your face without any animation queue issues, but remember to try any demos first because just like not all bodies will look the same with any given animation, the same will be true of mesh heads.
3.3 The Settings Universal HUD (FEMALE)
The Genesis Lab v3 Bento Head, whist it does not come with a Skin, it does come with physical options, standard cosmetics and a set of basic emotion expression animations and poses for your head. These are located inside of the HUD that comes with your head package.
The Genesis Lab v3 Bento Head, whist it does not come with a Skin, it does come with physical options, standard cosmetics and a set of basic emotion expression animations and poses for your head. These are located inside of the HUD that comes with your head package.
- Locate the Genesis_Lab_HUD_3.x_Settings_Universal item inside your head folder and ADD it.
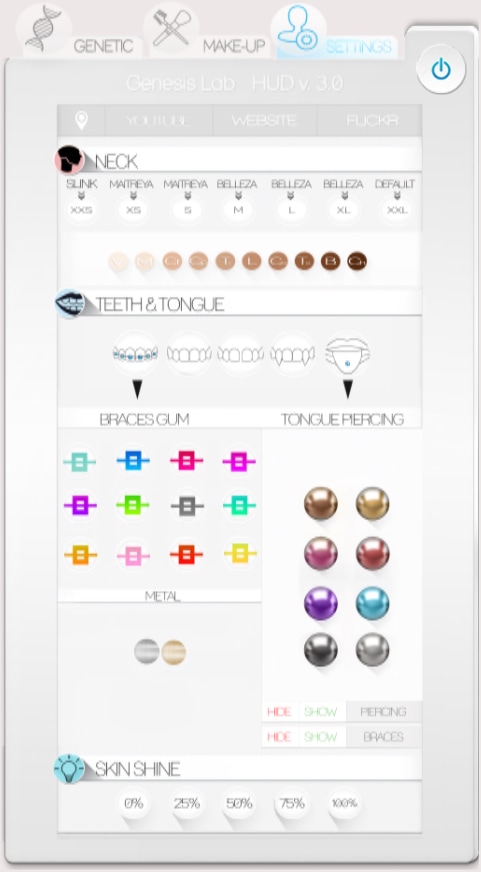
3.4 General Head Options
The Settings Tab (right tab) contains the assorted options for the head, including the buttons for setting up the included Genesis Lab Neck Fix item, Teeth and Tongue style and options, and the Shine (materials) of the Head.
The Settings Tab (right tab) contains the assorted options for the head, including the buttons for setting up the included Genesis Lab Neck Fix item, Teeth and Tongue style and options, and the Shine (materials) of the Head.
|
A couple of notes about using the Neck section:
|
3.5 Built-In Cosmetic Appliers
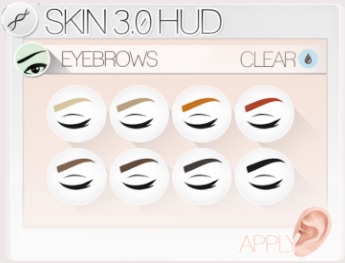
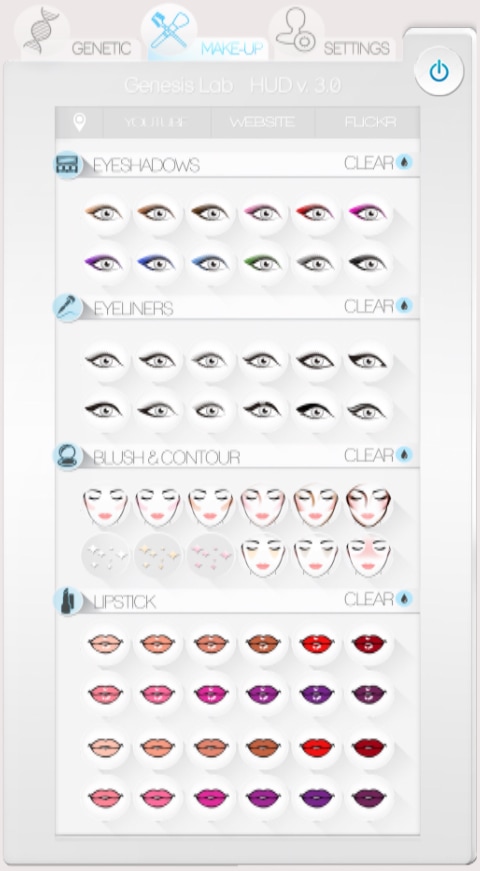
The Make-Up Tab (centre tab) contains all of the built-in cosmetics appliers that you can apply to your head, including eyeshadows, lipsticks, blush and highlighters. The buttons are arranged into sections and each section has a "clear" blue drop icon on the right to remove any applied texture to each kind of layer (eyeshadows / eyeliners from the Eyes Layer; lipsticks from the Lips Layer, etc.).
The Make-Up Tab (centre tab) contains all of the built-in cosmetics appliers that you can apply to your head, including eyeshadows, lipsticks, blush and highlighters. The buttons are arranged into sections and each section has a "clear" blue drop icon on the right to remove any applied texture to each kind of layer (eyeshadows / eyeliners from the Eyes Layer; lipsticks from the Lips Layer, etc.).
3.6 Built-In Extra Appliers
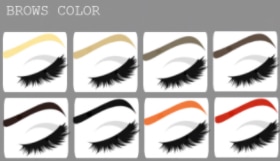
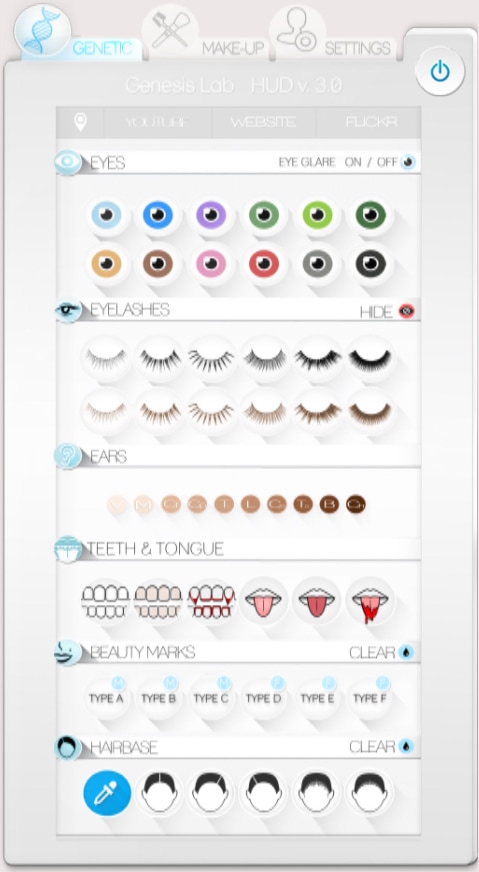
The Genetics Tab (left tab) contains the built-in appliers for your eyes, eyelashes, ears, teeth, tongue, beauty marks, and hairbases.
The Genetics Tab (left tab) contains the built-in appliers for your eyes, eyelashes, ears, teeth, tongue, beauty marks, and hairbases.
|
There are a few notes about using these extras.
|
More Information
- For a full walk through of every feature of your Settings Universal HUD, see: v3 HUD or v3 Male HUD
- For a full walk through of every feature of your Basic Animation HUD, see: v3 Animation HUD
- See the v3 Bento Head FAQ for help with the most common questions/issues: v3 Bento Heads
- To create a simple blinking AO, see: Bento Head Logistics
- To create a simple expression + blinking AO, see: Bento Head Logistics
- For the catalog(s) of Genesis Lab Appliers (Skin, Cosmetic and Tattoo), see: Reference Catalog
