This FAQ was written and is maintained by a third-party entity, Scorpius (Aiorii Resident). This FAQ makes no claim of official accuracy, endorsement, nor condoning by Genesis Lab. Please direct all questions regarding this FAQ to Scorpius.
This guide to the Genesis Lab v2 Heads has three sections: Folder Contents, Wearing the v2 Head, and Using the v2 Head. The wearing and using sections also contains tips for working with your Head past getting started.
This guide to the Genesis Lab v2 Heads has three sections: Folder Contents, Wearing the v2 Head, and Using the v2 Head. The wearing and using sections also contains tips for working with your Head past getting started.
Folder Contents
Inside of your v2 Head Package Folder are many items. This section details where/when each item is used.
Alphas
There are two alpha textures located in your package:
If you don't plan on wearing the old system eyes, regardless of which brand of eyes you use (I do suggest using the included bento eyes, at least at first), make sure you ADD (not WEAR) the Genesis_Lab_Alpha_Head(for mesh eyes) because it will hide the old system eyes (that you can't take off).
What happens if you WEAR not ADD the alpha item? The reason to use ADD, and not WEAR, is that WEAR is a replacement of any item which attaches to the same location. For an alpha item, if you are wanting to wear more than one alpha texture (say, one for your new head and one for your mesh body), choosing to WEAR the Genesis_Lab_Alpha_Head(for mesh eyes) item will replace the alpha item that you are already wearing.
There are two alpha textures located in your package:
- Genesis_Lab_Alpha_Head
- Genesis_Lab_Alpha_Head(for mesh eyes)
If you don't plan on wearing the old system eyes, regardless of which brand of eyes you use (I do suggest using the included bento eyes, at least at first), make sure you ADD (not WEAR) the Genesis_Lab_Alpha_Head(for mesh eyes) because it will hide the old system eyes (that you can't take off).
What happens if you WEAR not ADD the alpha item? The reason to use ADD, and not WEAR, is that WEAR is a replacement of any item which attaches to the same location. For an alpha item, if you are wanting to wear more than one alpha texture (say, one for your new head and one for your mesh body), choosing to WEAR the Genesis_Lab_Alpha_Head(for mesh eyes) item will replace the alpha item that you are already wearing.
Mesh Objects & HUDs
These are your actual pieces that make up your head and its multiple HUD controllers. Here is what each one is and what it does -- remember that NAME means the name of your specific Genesis Lab v3 Head, and that the x in 3.x means for all numbers of x, currently. This is a list of all of the standard items you will find in your folder, across the v2 product line.
These are your actual pieces that make up your head and its multiple HUD controllers. Here is what each one is and what it does -- remember that NAME means the name of your specific Genesis Lab v3 Head, and that the x in 3.x means for all numbers of x, currently. This is a list of all of the standard items you will find in your folder, across the v2 product line.
- Ear_L_2.x_Genesis_Lab :: this is your left ear.
- Ear_R_2.x_Genesis_Lab :: this is your right ear.
- Genesis_Head_NAME_2.x :: this is your actual mesh head. Alternatively, it may also be named like one of the following: Genesis_Lab_NAME_2.x, Genesis_Head_NAME_2.x_Emotions, Genesis_Head_NAME_2.x_Blinker, and similar.
- HUD_Genesis_Lab_EARS :: this is the HUD that controls your ear skin tone.
- HUD_Genesis_Lab_Skin_NAME_SKINTONE :: this is your main control & cosmetic HUD. It has its own guide, don't worry!
- L_Eyes_Genesis_Lab_2.x :: this is your left eye ("left" is generally meant to mean the eye on your left when you are looking at your avatar's face, however, for some of the older v2 heads, "left" actually means the avatar's left eye. All of the v2 Heads with swapped eyes are marked on the v2 Eyes and Eyelashes page).
- R_Eyes_Genesis_Lab_2.x :: this is your right eye ("right" is generally meant to mean the eye on your right when you are looking at your avatar's face, however, for some of the older v2 heads, "right" actually means the avatar's right eye. All of the v2 Heads with swapped eyes are marked on the v2 Eyes and Eyelashes page).
In addition, you may also have one or more of the following optional items in your folder (and variations of these names as well).
- HUD_Genesis_Lab_Eyes_ASIAN_EYE :: this is a special eye applier that has three shades in an asian eye style.
- HUD_Genesis_Eyelashes_Positioner_1.x :: this is the HUD to reposition the Eyelashes on any v2 Blinker Head Type.
- Genesis_Eyelashes_Modify :: these are the Eyelashes for any v2 Static Head Type (you will need to ADD them if you would like to use Genesis Lab Eyelashes / Eyelash Appliers).
- Genesis_Lab_Teeth and tong NAME 2.x :: this item is a tongue and teeth combination for making specific kinds of expressions.
- Genesis_Lab_Teeth :: this is the standard Teeth item for any of the open mount variations.
- HUD_Genesis_Lab_TONGUE/TEETH :: this is the HUD that controls the tongue and teeth combination item.
- HUD_Genesis_Head_NAME_2.x_Emotions :: this is the HUD for an Emotions Static Type Head. It is specific to a single Head and will not work on others. Also, this item will not work on any Blinker Head Type or v3 Bento Head Type either.
- HUD_Blinker_Genesis_Head_2.x :: this is the Blinking Section of the standard v2 Skin HUD in a separate control HUD.
- HUD_Genesis_Lab_EYELASHES :: this is an Eyelash Style/Colour Applier HUD.
- HUD_Genesis_Lab_HAIRBASE :: this is a Hairbase Style/Colour Applier HUD.
- Button_Hairbase_CLEAR :: this is a single button designed to clear any textures that have been applied to a Genesis Lab Hairbase.
- Button_Lipstick_CLEAR :: this is a single button designed to clear any textures that have been applied to the Lips Layer of a v2 Head.
- L_Eyes_Genesis_Lab_2.x_COLOURNAME :: this is a regular Genesis Lab v2 Eye that has had a special texture applied to it, which is not available in a HUD; COLOURNAME can be Brown, Black, Green, Ghost, etc.
- R_Eyes_Genesis_Lab_2.x_COLOURNAME :: this is a regular Genesis Lab v2 Eye that has had a special texture applied to it, which is not available in a HUD; COLOURNAME can be Brown, Black, Green, Ghost, etc.
- Genesis_Lab_ALL_Appliers_SKINTONE_Skin :: this is a set of body appliers in a specific Skin Tone.
- HUD_MAKE-UP_Genesis_Head_NAME_2.x :: this is a Cosmetic Applier HUD without the v2 Head control functionality.
Everything else
The items left in the folder are most likely: the store landmark (optional), notecards about updates / the location of matching body appliers, an animation script that was in the purchase bag/box (optional), and the WEAR IT! (for eyes) Shape, in case you would like to use it.
The items left in the folder are most likely: the store landmark (optional), notecards about updates / the location of matching body appliers, an animation script that was in the purchase bag/box (optional), and the WEAR IT! (for eyes) Shape, in case you would like to use it.
Wearing the Genesis Lab v2 Head
This part is much easier now that we've outlined what's in your folder. There are a few things that can make wearing your head easier to manage as well as some simple solutions for basic problems.
In this guide, 2.x means any number for x, like 2.1, 2.2, etc. NAME means the name of your head (like Ingrid or Isabel). If you need to check the folder contents to make sure you are choosing the correct item to wear, check the section above (folder contents).
In this guide, 2.x means any number for x, like 2.1, 2.2, etc. NAME means the name of your head (like Ingrid or Isabel). If you need to check the folder contents to make sure you are choosing the correct item to wear, check the section above (folder contents).
Quick-Fix Tip: Before adding any of the items for your new head, save your current outfit (Appearance window). This way, if you accidentally choose WEAR instead of ADD -- you can easily go back!
Tip: It is also helpful when you are working with your avatar to use a pose stand to keep your avatar still like a doll.
Tip: It is also helpful when you are working with your avatar to use a pose stand to keep your avatar still like a doll.
1. Underlying Items First (to decrease the likelihood of your mesh head warping on "off" days)
Locate the Genesis_Lab_Alpha_Head(for mesh eyes) item in your Head's folder and ADD it.
This will clear any old second life default avatar body out of the way. We use the one with (for mesh eyes) because we will be adding the eyes that came with your head (at least for now). To use any eyes other than the system eyes (default second life ones), you must use this alpha item.
If you would like to see your Genesis Lab v2 Head the way it shows in any of the promotional photos or if you would like the Eyes and Eyelashes to fit without requiring any editing, you will need to either use the shape that comes with the Head, or change the three settings (Head Size, Head Stretch, and Head Length) in your shape to match the same settings for your Head, as listed on the v2 Head Shape Values page under your v2 Head Name.
2. Ears, Teeth, and Eyes
To start with, we will add all of the standard features of the Genesis Lab v2 Head to your avatar, which includes the Ears, Teeth, and Eyes. The Teeth item may not come with your head if your v2 Head does not have an open mouth feature, so you can ignore this item if you do not have one in your v2 Head's folder. You may also ignore the eyelashes items if you have a v2 Blink Head type, as your eyelashes will be part of your head and not a separate item.
Locate the following items in your Head's folder and ADD them (it may look unsightly, lol):
- L_Eyes_Genesis_Lab_2.x
- R_Eyes_Genesis_Lab_2.x
- Ear_L_2.x_Genesis_Lab
- Ear_R_2.x_Genesis_Lab
- Genesis_Lab_Teeth or Genesis_Lab_Teeth and tong NAME 2.x
- Genesis_Lab_Eyelashes_NAME_2.0 or Genesis_Eyelashes_Modify or Genesis_Lab_Eyelashes_NAME
3. The Head!
With all that set up, this part seems almost too easy!
Locate the v3 head item in your Head's folder and ADD it. That's your new head! Ta-da!
(Please Note: your v2 Head may also be named like one of the following: Genesis_Lab_NAME_2.x, Genesis_Head_NAME_2.x_Emotions, Genesis_Head_NAME_2.x_Blinker, and similar
With all that set up, this part seems almost too easy!
Locate the v3 head item in your Head's folder and ADD it. That's your new head! Ta-da!
- Genesis_Head_NAME_2.x
(Please Note: your v2 Head may also be named like one of the following: Genesis_Lab_NAME_2.x, Genesis_Head_NAME_2.x_Emotions, Genesis_Head_NAME_2.x_Blinker, and similar
Tip: If you save your outfit now, you'll have an outfit which contains your head fully-assembled on your avatar. Using your Genesis Lab 3.0+ Bento Head won't add anything to your head that you need to keep in an outfit (for the most part), so you can use this new saved outfit as a starting point for using your mesh head if you need to come back to it later.
Quick-Fix Tip: If you have added your new v2 Head and your Eyes are popping through the eyelids or the Eyelashes are too far back or forward, you will either need to change three settings in your shape or you will have to edit your Eyes and Eyelashes positions. The significantly faster and easier solution is to change the Head Size, Head Stretch, and Head Length (three values) to the ones on the v2 Head Shape Values page for your v2 Head Name. Once you have changed those values, simply save your shape and your Eyes and Eyelashes will automatically fit correctly.
Quick-Fix Tip: If you have added your new v2 Head and your Eyes are popping through the eyelids or the Eyelashes are too far back or forward, you will either need to change three settings in your shape or you will have to edit your Eyes and Eyelashes positions. The significantly faster and easier solution is to change the Head Size, Head Stretch, and Head Length (three values) to the ones on the v2 Head Shape Values page for your v2 Head Name. Once you have changed those values, simply save your shape and your Eyes and Eyelashes will automatically fit correctly.
Using the Genesis Lab v2 Head
With your Head attached, let's work through a few of the basics to using your head. There is link to a full instruction guide for the v2 Skin HUD for when you want to go further, as this section will only cover the essentials.
In this guide, NAME means the name of your head (like Eva or Lena) and SKINTONE means the name of the skin colour you've chosen (like Milk, Cream, Cappuccino, etc.)
In this guide, NAME means the name of your head (like Eva or Lena) and SKINTONE means the name of the skin colour you've chosen (like Milk, Cream, Cappuccino, etc.)
1. How Textures Work on the Head
With all of the current mesh heads (Genesis Lab brand or other), there are a set of invisible layers sitting on top of the mesh head itself. The mesh head and these layers allow you to apply textures to them and add things like skins, eyeshadows, lipsticks, or tattoos to the head. All of these areas of the head are no-modify, so you must use an Applier to change the texture of these layers.
An Applier is a HUD that you attach (ADD) to your Avatar and then use the buttons to apply the texture changes to your head. The Genesis Lab v2 Mesh Head has the following areas which can be changed by an Applier.
Please Note: the Genesis Lab v2 Heads are NOT Omega Compatible, and will not work with the Omega System Kit, Relay, or Omega Appliers!
Please Note: Layers marked with (^) may require a separate Layer item to be attached in order to use Appliers. Layers marked with (*) are not available on all v2 Heads! Please see the References section - Skin & Cosmetic Appliers for a list of v2 Heads which do not have all of the v2 Head Location Layers.
Now that you know what layers you have available on your head, let's start by choosing options and applying them to your Skin in the next section.
With all of the current mesh heads (Genesis Lab brand or other), there are a set of invisible layers sitting on top of the mesh head itself. The mesh head and these layers allow you to apply textures to them and add things like skins, eyeshadows, lipsticks, or tattoos to the head. All of these areas of the head are no-modify, so you must use an Applier to change the texture of these layers.
An Applier is a HUD that you attach (ADD) to your Avatar and then use the buttons to apply the texture changes to your head. The Genesis Lab v2 Mesh Head has the following areas which can be changed by an Applier.
Please Note: the Genesis Lab v2 Heads are NOT Omega Compatible, and will not work with the Omega System Kit, Relay, or Omega Appliers!
- Head Location
- The Mesh Head Layer (This is where any Skin will apply.)
- Lips Layer (^) (This is a semi-circular area around the mouth for Lipsticks and other appliers.)
- Eyes Layer (*) (This is a mask of the face around the lips area for Eyeshadows and other appliers.)
- Tattoo Layer (*) (This is the entire head for Tattoos and other appliers.)
- Hairbase Layer (^) (This is for a "cap" that covers the back of the head for Hairbases and other appliers.)
- Eyelashes (*) (This is where any Eyelashes will apply a texture.)
- Eyes Location
- Base Layer (This is where most Eyes will apply a texture.)
- Ears Location
- Ears Layer (This is where any Ears will apply a texture.)
Please Note: Layers marked with (^) may require a separate Layer item to be attached in order to use Appliers. Layers marked with (*) are not available on all v2 Heads! Please see the References section - Skin & Cosmetic Appliers for a list of v2 Heads which do not have all of the v2 Head Location Layers.
Now that you know what layers you have available on your head, let's start by choosing options and applying them to your Skin in the next section.
2. Apply Your Skin to your Head
Although the steps for applying a skin are written for the Genesis Lab Skin Appliers, the same general idea of attaching the HUD and clicking on a button, then detaching, will apply to any Skin Applier, and really, any Cosmetic Applier as well.
Genesis Lab v2 Skins (as well as Genesis Lab v3 Skins) come packaged in a box, so you will need to add the package and accept the folder before being able to use the applier. (If that fails, simply rez the package on the ground and open, then copy/move the contents to your inventory). For v2 Skins that come with v2 Heads, or for older purchase deliveries, the HUD will be in your Head/Skin Name's Folder.
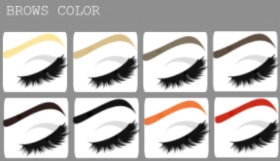
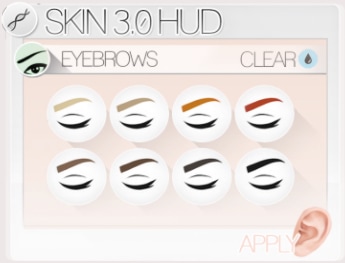
Skins that are separate from Heads (whether v2 or v3) will have a HUD where you simply choose the eyebrow colour you would like and click it to apply the Skin with that Eyebrow Shade (see the v2 Skin HUD and v3 Skin HUD example images below).
- Locate your Skin's Folder and ADD the HUD_Genesis_Lab_Skin_NAME_SKINTONE item.
|
|
|
Please Note: The v3 Skins do not exactly align perfectly at the neck seam with the v3 Body Appliers when using them on a v2 Head! You will need a way to cover the slight error, like your mesh body's neck fix. The reason for this misalignment is due to the bento bone-based neck stem differences between the v2 Heads and the v3 Bento Heads.
|
- Once you have applied your Skin, it may take a few moments to finish applying the texture to the head. The reason it will take a moment or two at first is because it is loading the texture into your viewer's image store (cache) and matching up the UV map to the head points. Once it has finished applying however, it is now in your cache (unless you change which Skin is applied, in which case then it might be tossed out and require it to be re-loaded if you decide to use it again).
- If your Skin persists in staying grey or not coming in fully, you can try clicking on the eyebrow button again. (If you have applied any cosmetics, try removing them and clicking the eyebrow button on the Skin Applier again -- but don't worry if you haven't done anything yet.) Sometimes Second Life has periods where an item on your avatar has seemingly gotten "caught" and prevents you from changing parts of your avatar. You can try removing other items to see if your skin appears and then add those items back after.
With the base skin applied, we'll take a look at some basic features of the HUD in the next section of the guide and explain what the head can and can't do.
3. Basics of your Mesh Head
This section covers some basics of using your Genesis Lab v2 HUDs, but leaves out much of the full walk-through of the v2 Skin HUD, more advanced topics, and any detailed troubleshooting / support, which are indicated by links to those specific topics in the more information section at the bottom of this page. Please see those links for any issues when using your Genesis Lab v2 Skin HUD, or the Genesis Lab v2 Emotions HUD.
In this FAQ, 2.x means any version that is 2.0 or a higher decimal value, such as 2.1, 2.101, 2.2, etc. Always check with the redelivery terminal to see if you have the latest version.
3.1 Basic Head Types
Let's start with a little bit of foundational information. The v2 Genesis Lab Mesh Heads were created prior to the arrival of The Bento Project, which means that they could not offer the advanced bone rigging that allows the v3 Bento Heads to be animated or posed by bone manipulations, like how the mesh bodies work. In order to offer more realistic features, "frame-based multi-mesh" techniques were used on the v2 Heads in order to give them either blinking eyes or different facial expressions.
The multi-mesh technique or method essentially takes copies of a mesh item which has been altered into different positions and links them together into one object. So to create a "blink" effect, you take, for example, five mesh items: eyelid open, eyelid 75% open, eyelid 50% open, eyelid 25% open, eyelid closed, and then link them all together into a single "eyelid" item that you can then link to a mesh head. In order to give the appearance of actually blinking, a script then changes all of the eyelids to invisible except the item that is the "first animation frame", so the eyelid open item is visible. Then the script makes all of the eyelids invisible except the "second animation frame", which is the eyelid 75% open item, and continues turning the eyelids invisible with one visible, in sequence. This gives the illusion that the eyelid is animated (blinking). A similar technique is used to changed "expressions" on the face by linking together heads with different expressions and then having a script change invisibility of the different heads.
Because of the high complexity and script usage of the multi-mesh method, adding blinking and expressions together is an increasingly difficult and weighty proposition, thus none of the v2 Heads contain both blinking and expressions together in the same head. That leaves the v2 Heads with the following Head Types: Blinker, Emotions Static, and Static (where Emotions Static means non-blinking and Static means no alternate expressions and also non-blinking).
3.2 The Skin HUD
For the v2 Heads of Blinker, Emotions Static and Static types, the basic controls as well as the included Skin & Cosmetic Applier sets are located in the Skin HUD included in your Head's folder. This introduction only gives an overview for this HUD and does not explore it in detail. For a full walkthrough of the Skin HUD, please see the links at the bottom of this page.
For the v2 Heads of Blinker, Emotions Static and Static types, the basic controls as well as the included Skin & Cosmetic Applier sets are located in the Skin HUD included in your Head's folder. This introduction only gives an overview for this HUD and does not explore it in detail. For a full walkthrough of the Skin HUD, please see the links at the bottom of this page.
- Locate the HUD_Genesis_Lab_Skin_NAME_SKINTONE item inside your head folder and ADD it.

|
This HUD is your main source for working with your Skin, Hairbases, Eyelashes, Eyes, Cosmetics, Tattoos, and the blinking features (if your head is a Blinker type. Please see the References section - Head Type Catalog if you are unsure what type of head you have.
Please note: your HUD may not look like the one shown!
|
This hud also includes two special sections:
- Clear Layers allows you to remove all of the textures on a specific layer from your face. If you've applied a lipstick you just do not like or it has gone wrong, you can click the Lipstick button in this section to clear it out -- and the same is true for the other layers.
- The Eyes Position/Blinker section allows you to either set your eyelid position directly (which means it won't move - it will be static) or turn on/off the Blinking feature of your head (if this section is not crossed off, or you are not using a different Skin on your Static Head).
3.3 Eyes and Eyelashes
With the v2 Heads, your Eyes and Eyelashes will not move with any changes you make to your Head's size or shape, so these items are meant to be modifiable, although they can be tricky.
The easiest way to make your Eyes and Eyelashes fir your head without requiring any adjusting is to edit your shape and change three values to numbers that are "special" for your head. The v2 Heads have only a very limited amount of change that they can undergo, in any regard, and using the three shape numbers doesn't change the look of your head in a very meaningful way, but it can make the difference between having the eyelashes and eyes fit without hassle or spending a lot of time trying to get them "just right".
- All of the v2 Heads' shape values for easy Eye and Eyelash fitting are listed here: v2 Head Shape Values.
- If you've already moved your Eyes and would like to return them back to their original position so that you don't have to mess with the Eyelashes, you can find the position and rotation values here: v2 Eyes and Eyelashes.
If instead you would rather use your own values and you find that your Eyelashes no longer fit against your eyelids, you will need to modify their position. If you have a v2 Blinker Type Head, you will need to use the included positioning HUD.
- Locate the HUD_Genesis_Eyelashes_Positioner_1.1 item in your inventory and ADD it.
Warning: please be careful when using this HUD! If you click too many times too fast, it will crash on you and there is NO WAY to fix it! If you have a non-gacha Head package, you will need to open a fresh package and start over with a new HUD (and possible a new Head as well) to use it again. If you have a gacha Head, *IT CANNOT BE FIXED*.

|
This HUD (shown at left) can be a bit hard to read and use at first, but once all of the buttons are explained, it will be easier to use.
The buttons, from left to right: |
- Power Button: This is the round button all the way over on the left. It will hide the HUD into a small round button when it is "off" or show the full size of the HUD (as shown above) when it is "on".
- Up Button: This button will move ALL EYELASHES "up" in space. Please Note: "UP" can also be what you would consider "down" on some heads!
- Down Button: This button will move ALL EYELASHES "down" in space. Again, Please Note: "DOWN" can also be what you would consider "up" on some heads!
- Left Button: This button will move ALL EYELASHES to the "left" across your face. Please Note: "LEFT" on some heads is the Avatar's left and not YOUR left.
- Right Button: This button will move ALL EYELASHES to the "right" across your face. Please Note: "RIGHT" on some heads is the Avatar's right and not YOUR right.
- Forward Button: This button will move ALL EYELASHES "away" from the head. Please Note: "FORWARD" on some heads means that the lashes go INTO the head and not away from it.
- Back Button: This button will move ALL EYELASHES "toward" or "into" the head. Please Note: "BACK" on some heads means that the lashes go AWAY from the face and not towards it.
- + (Plus) Button: This button will INCREASE how much each of the other buttons moves the Eyelashes with each click. It applies to ALL buttons at once.
- - (Minus) Button: This button will DECREASE how much each of the other buttons moves the Eyelashes with each click. It applies to ALL buttons at once.
Lastly, if you have would like to reset your Eyelashes back to the way that they came with the Head, please follow these instructions for restoring your Eyelashes:
- Right Click on your *EYELASHES* (you will need to zoom in, most likely, to make sure you are not clicking on your Head!)
- Choose "Touch" from the popup menu.
- When the script menu appears, choose "Restore".
More Information
- For a full walk through of every feature of your Skin HUD, see: v2 Skin HUD
- See the v2 Head FAQ for help with the most common questions/issues: v2 Heads
- For all of the Head Types available with Genesis Lab products, see: Head Type Catalog
- For the catalog(s) of Genesis Lab Appliers (Skin, Cosmetic and Tattoo), see: Reference Catalog
